My Voiceover Home Studio
- Mar 30, 2021
- 11 min read
Updated: Jun 3, 2025
Here's how my new home studio came together, thanks to the incredible team at VO Tech Guru

NOTE: Make sure to click the play button above to check out the cool time lapse video of the build! You can check out my planning (and pivoting!) for this studio studio build HERE,and check out my very first studio build HERE
Once (somewhat) settled in my new home, I set up my trusty Tri-Booth in our upstairs loft so that I could be sure to accommodate any clients that needed my services until my shiny new booth was finished. I also set up a temporary office upstairs to work until my new studio/office was complete. The plan was to build a custom booth in our second bedroom downstairs which I would convert into my permanent office. I wanted to have a space that would accommodate a separate studio for recording, as well as a beautiful acoustically treated space where I could enjoy the daylight of my office and tend to my coaching, hosting webinars, and other parts of my business.
The plans were laid out and everyone got onto the same page. My build team consisted of Tim, Tim’s son Travis, Tom Glander, who was a local friend and previous contractor, and my Dad. How lucky was I? All of these amazing people in one place, solely here to build my dream studio! The dust was about to fly and excitement was in the air.

I think it’s important to revisit the challenges that were facing us. First, the booth had to be stand-alone, a room within a room in order to protect the integrity of the original room construction. Second, there were windows on two different sides of the room which was a challenge regarding sound bleed from the street, and exterior aesthetics needed to be maintained. Third, the original room actually had to support two workspaces, my booth, and my office space. Lastly, the booth needed adequate ventilation without sacrificing sound isolation.
It should be noted that early on Tim and I made the decision to not construct any windows in my booth. I remember telling him how I had never had a window in my booth and I was really thinking it could be cool to have one now. Tim asked me how happy I was with my booth before without a window and I said my booth was amazing and always got compliments on its sound. He mentioned that although adding a window might be atheistically pleasing, it would add a more complex layer to the booth that would need to be treated differently, especially if my microphone would be near it. In order to have the most optimal sound, I would ultimately have to cover the window with additional treatment before recording. I decided that it would just be easier without a window, and for the record, I am super happy with my decision! Not only is it a no-brainer for even sound acoustics, but it makes my booth easier to light for my coaching events and webinars as I don't need to accommodate for additional light coming in from any particular side.
A Tale of Two Offices

The Plan Comes Together
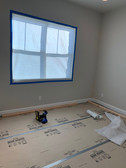
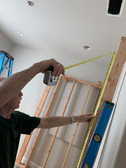
Before framing could begin, we had to make sure there would be sufficient room for the outside office standing desk and chair in addition to an adequate amount of room inside the booth. It’s worth it to double-check all the measurements. The two biggest considerations were the existing window and balancing the amount of space inside the booth with the space outside. Even though the booth is technically freestanding, it needed to feel like a natural part of the room. We also needed to accommodate where the booth door would be in relation to my outside desk and chair to make sure I could easily get in and out.
A decision was made to frost the glass of the side window in the room. We knew all along that this window was going to be insulated and covered up. Even though this window is on the side of the house that no one really sees, frosting the glass would help the external appearance. A square of Rockwool was fitted to the opening and the window was covered with two layers of drywall and sealed airtight. This would ensure that no external street noise would translate into the booth. BTW, this was technically the part of the booth that I would be facing when recording.


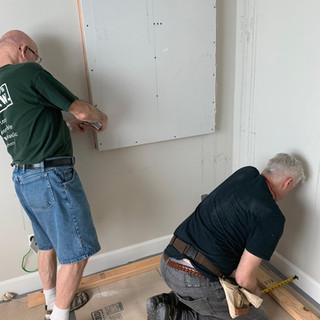


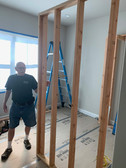
Now the framing could begin in earnest. We used standard 2x4 studs to frame the walls which were adequate because the build would actually have two separate walls that were decoupled from each other. You’ll notice great care was taken to protect the floor, windows, and walls during construction. To that effect, all the framing was assembled in the garage and brought into the room. As the framing was going up, we didn’t add an extra layer to the floor for sound isolation. This home was built on a concrete slab and then carpeted. So, it wasn’t necessary to raise and decouple from the mass of the concrete below. This small consideration helped maintain harmony between the two spaces in the room without sacrificing audio quality.
Not only was Tim adept at the construction of the booth - but he was also able to wire all of the electrical outlets in the front, back, side, and ultimately the ceiling of the booth! He also made sure to bring my hardwired ethernet connection into my booth. In addition to this, he also relocated an existing jack on the front wall of my office as my new studio was going to cover it up. In case you don't know Tim, he is extremely detailed and really is passionate to create a perfect space. I have such gratitude and admiration for his work and the work of the entire team.


Adding ventilation
One of the major challenges of any home studio recording booth is ventilation. Booths are notoriously hot spaces. Since my office was in the only area of the house encased by brick, I basically chose to put my office in a pizza oven!! Proper ventilation would be an even bigger challenge due to the need to maintain adequate sound isolation from road noise through the two giant windows. Also, you can’t just have a vent blow straight into the room, it’s way too noisy. What to do? It’s not an easy task.
The clever way that Tim solved this problem is with something called a plenum. It’s a chamber that facilitates air circulation by providing pathways for HVAC at greater than atmospheric pressure. Hunh? Notice that the framing for the booth doesn’t actually reach all the way to the original ceiling. And you can also see the HVAC duct is directly above the booth.


The solution is to create a chamber above the booth that the HVAC can blow into, once that space fills up with enough air pressure, the air will naturally look for a way to escape the space. Because there is an air gap between the original wall and the new booth, the air can travel between the two walls and enter the booth via a small 8x8 opening. This allows fresh air to enter the booth without introducing the noise from the HVAC system, and it maintains the isolation from the exterior. The air is then exhausted from the booth via the small cable hole on the opposite side.

Once all the framing and the first round of Rockwool insulation were in, it was time to mockup the space with the monitor and boom arms so there could be beams placed appropriately for mounting once the second layer of drywall went in. My monitor and boom arm mounts were custom adjusted for optimal height for me. My monitor arm would be adjustable so I would have the option of sitting or standing in the booth. I was also going to have a desk custom made and installed as well. Whoa - time to find a proper chair that would fit in the booth! Costco here I come!
This is when things started to feel real, and my excitement started to rise. Being able to sit in the space and have a tactile feel for where the different elements were going to be allowed us to make small, yet perfectly precise, ergonomic adjustments.
With the electrical run and plenty of Rockwool filling every gap, it was time to put up the drywall. Now, in order to understand the logic of this construction, we're going to get a little bit technical. Stay with me, I promise it will be worth it. :)
Sound travels as energy in air pressure waves. That energy can transverse solid material. The idea for sound isolation is to create varying degrees of mass that will slow down or eliminate that transfer of energy. The best way to do that is with dense mass, and air gaps between the mass. The booth was constructed with this idea in mind. Think, wall – air gap – wall. And in more detail, each wall had two layers of drywall, which is very dense, with a substance called Green Glue smeared between the two drywall layers. The Green Glue acts as a semi-viscous layer that helps to reduce outside sound from crossing that barrier. The Rockwool insulation is really good at trapping pesky lower frequencies due to its density and internal structure. Then there is the actual air gap between walls. This decoupling of the two walls helps to eliminate the sound that travels through the solid parts of the wall like the 2x4’s. Then the process is repeated for the inside wall. So, for those of you playing along at home, the final configuration looks like this:
Drywall/Green Glue/drywall/Rockwool/ airgap /Rockwool/drywall/Green Glue/drywall.

When one door closes, another one also closes.
To maintain the benefit of that airgap and to have the least amount of sound penetration, it was necessary to have two doors, one for each wall. This is where the concept of small details leads to big results. If I were to just have one door, then I would sacrifice all the benefits of that air space. But I’m not building a safe room, I’m building a vocal booth. We opted to buy aluminum doors from Home Depot as solid oak doors would be too expensive. We would ultimately be covering both sides of the door with acoustic panels anyway.
Because these were stock doors from Home Depot, there was no option to get them without a key lock. My Dad, being protective, was insistent that there should be no way to be locked in or out of that room, and so we literally took out the deadbolt so they could not be locked from the inside or outside. I have heard stories of voice actors that have accidentally locked themselves inside their booth. If you have read the story of my first booth that my Dad built, you'll know that my Dad is hyper-aware about safety, in fact, he’s adamant. And I agree - people should be able to get to you in the case of an emergency. So even though you see a deadbolt on the door, it’s not functional. It’s just there to fill the hole in the door.

Choices, choices...
Just as a quick side note, you may have noticed that I installed two boom arms into my booth. One for my TLM 103, and the other for my Sennheiser 416. This is an option I’ve always wanted to have. I use a Sescom SES-XLR-AB Passive Switch to choose between them. It’s so much easier to just flip a switch to choose which microphone to use when the fancy strikes without having to change the mics and shock mounts and settings. Pretty much for the last 15 years, I’ve used my TLM 103 in my booth, with my Sennheiser 416 saved for travel purposes. But when I was transitioning during this move, I needed to switch over to the 416. With its hyper-cardioid pattern, it worked the best in my temporary booth setups during my transition. Even though I don’t necessarily need the hyper-cardioid pattern in the new booth, I’m continuing to use it still because I love the way it makes me sound as well as for the sake of consistency. Plus, it’s pretty BOSS to have two mics on two boom arms, I’m just sayin’. :)
Almost finished is not actually finished.
Wow, now It’s really starting to look like a booth! The desire to hurry to the finish line when it’s this close is really strong. Not to mention that during this whole time, we started hearing a lot about this crazy thing called COVID-19 on the news! Eek! But I have to say, Tim is a consummate professional. He was detail-oriented to the very end. Tim made sure when he moved the ceiling fan to the new center of the room that the old fixture box would be accessible if the booth was removed. The same with the can light that was now buried on the ceiling above my booth! Tom Glander made an amazing custom desk that fit inside the booth like a glove. Every detail was perfect. Then came sanding and painting, and installation of matching trim so it would look like part of the room. It was truly amazing.


Installing world-famous acoustic panels and innovative lighting
Now, just because my studio is now well isolated, doesn’t mean it’s acoustically treated. For that, we would turn to the world-famous Tim Tippets acoustic panel design. Every surface was measured, and an acoustic panel was custom-sized to fit the space perfectly, including a drop ceiling inside my booth. I have a total of 23 of those custom panels both inside my booth and around my office! If you haven’t seen Tim’s Acoustic panel video, make sure to take some time to watch it. Each panel is designed to effectively reduce unwanted reflections. After all that time and effort, as a final test, Jerry and I got into the booth and screamed our heads off. And guess what? In space, no one can hear you scream, also in my booth. :)
One of the last steps was to install lighting. Of course, I wanted all of the pretty colors! The guys came up with a great design to mount colored LED rope lights onto a custom-built rectangular metal bar that was installed on the ceiling of the booth for the most evenly distributed lights from above. Of course, these lights had to be plugged in somewhere - ah ha - this is where Tim's genius just never stops. We were able to plug in on the outlet that he installed in the ceiling so no one would ever see the wires!


So how much did it all cost?
Just a quick note about material costs and time. All said and done, the build took a little less than 2 weeks, with all of my specific customizations and last-minute add ons. The building material costs alone came to about $7000 in the end, which was actually quite cost-efficient. This included lumber, drywall, Rockwool, Green Glue, electrical, doors, hardware, lighting, paint, and trim. As far as labor costs, if you were to construct something similar, you should expect to pay what a local contractor typically charges. Based on your area, your mileage may vary. In addition to Tim, I had 2-3 other team members pretty much the entire time.
The true value in the booth was not just in the physical components of the build, but in Tim's expertise in design and acoustics, which is worth its weight in gold.
Once I had this gorgeous space to record in, I took some time to upgrade a few other components, including upgrading my audio interface to an Apollo Solo which I love! If you'd like to check out some of the awesome equipment I use in my studio and office, check out my Studio Glow Up Page!

Years Later...and I'm STILL in LOVE with my home studio
I’ve been working in my new booth for a few years now, what would I change? Absolutely nothing. I LOVE it. My new booth is perfect! It gets me a little emotional, but I have much love and gratitude for my team. They literally built me a space of dreams. I am so grateful and joyful for every day I get to spend in it doing what I love for a living, and my team played a huge part in that. And that's really all any voiceover artist can ask for, isn't it?
By the way you can check out more about my planning (and pivoting!) for this studio studio build HERE, and check out my original studio build HERE.
About Anne
Anne Ganguzza is California-based Voice Actor, Voiceover Coach, and award-winning Director & Producer specializing in target-marketed Voiceover Demo Production.